
An edit has been made + soundtrack. Might be a bit long but so far it's doable. The shots that needed to be match moved have been tracked as well. So for this week:
Coen:
Dummy Geo + Asset Creation (rounding up) and some per shot research
Ben:
BackPlate cleaning and initial color correction, Dummy Geo and some per shot research
That's all!
Monday, 14 July 2008
Saturday, 7 June 2008
Master Blaster Final Edit
It's done! Term 3 is over and here is my final 1 minute video, including:
all of my systems
shitloads of camera tracking
dynamics
lightmatching
modelling
etc.
software used:
Houdini
Jitter
Shake
Cubase
Premiere
and a bit of python
Hope you enjoy it, here's the link: SAVE_AS
Or you can watch the crappy compression version here:


Saturday, 17 May 2008
wall explosion using video
All my systems are in place.
1: Procedural lightrig based in impact
2: Deformation using briqs, pixels or glass
3: Particle Based Shatter for screens and walls
Tuesday, 13 May 2008
Monday, 12 May 2008
tv + displacetest and shatter
Found a nice model online, only problem was that the polycount was low. So funked it up a bit and applied some test RGB footage. After that I wanted the object to push the pixels out of the tv, using particles for that. Will upload a quick video of that tomorrow but for now a screen.


Sunday, 11 May 2008
scramblesession in 3d
For now it looks that the very fast scramble set get's converted pretty well in houdini.Here are some quick renders using different angles but the same frame(s)


first scramblesessions
Here are two randomly generated tests using the system. I only gave it some input commands and let it run on the music for about 1 minute. The first one is better in my opinion (the one right under this text). I went for lines this time but the squares will come in play later on.
Everything is live and everything is realtime. Only when I try to run it in a resolution higher then 320 240 it starts chugging. Which means I have to render it out instead of capture it live.
320 *240 = 20 to 25 fps
640*480 = 10 to 15 fps
720*576 = 7 to 14 fps


A higher quality version of the first scramblesession is available here: CLICK
Saturday, 10 May 2008
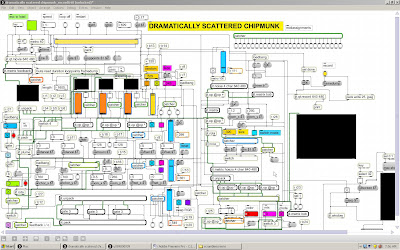
dramatically scattered chipmunk is working
After a hard week of work the program's finally done. It gives me full control over every single RGB value and scrambles the hell out of your grandma. It can go completely random or be midi controlled (and still go crazy). It feedbacks it's way through a bunch of matrices and the output is realtime. I will upload some random sessions today but for now the wire chaos will do.
I wanted a hands on approach, think I've got it. But I have to see how it turns out in 3d.
I wanted a hands on approach, think I've got it. But I have to see how it turns out in 3d.

Monday, 5 May 2008
patch almost done
I said I would try to finish it this weekend. As it turns out it took some more time but the patch has got a lot more functionality at the moment. Will finish it tomorrow and hook it up to midi


Friday, 2 May 2008
jitter examples
 So I've been trying to get my head around jitter. What I need is a midi / audio controlled RGB filter system that can scramble the shit out of my footage at the same time. I got the two parts working but have to set up a layout for how it is going to be build. What do I exactly need? A good goal for this weekend I guess.
Thursday, 1 May 2008
stills from RGB testshoot
For my displacement based on video I had a test shoot in the tv studio.
I used an RGB light setup to highlight different elements of the human body. Having this information gives me the freedom to manipulate each different color value separate in 2 and 3d.
I started developing a 2d filtering system that can be linked up to audio. This can control what color appears with what value and if it get's distorted or not. Switching the matrices on the go. If all goes well this should be done this week. Giving me ultimate control over the deformations in real time.
All the images in this post are stills, directly taken from the footage. No post production has been done except the tuning of the levels
I'd like to thank Ben, Ben and Cleve for helping me out!


few stills from location scout
Found a great location that resembles the pictures in my moodboard (see first post)
It's a deserted military training facility outside of Bournemouth. There are loads of different little houses that you can enter, to either film or photograph.
These pictures are stills from a testshoot. Just to give an impression. Will go back later for the actual shooting.


It's a deserted military training facility outside of Bournemouth. There are loads of different little houses that you can enter, to either film or photograph.
These pictures are stills from a testshoot. Just to give an impression. Will go back later for the actual shooting.


Tuesday, 29 April 2008


Monday, 28 April 2008
Final Composition
Visual Piece I did before, based upon a track from Deru. The zip containing the video can ben found here:
Friday, 25 April 2008
deformations, fractals, sops and chops
I've been researching 3 different displacement ways. Displacement through glass, cloth and bricks. The last one gave me some results today.
Based on point transformation caused by images on a grid i was able to feed this into a chopnet and play around with the values it gave me. I wanted more control over how the geometry actually got displaced. For every primitive I have a point which I can use in a for loop to be stamped upon the actual geometry to be displaced. Already procedural.
Next week (network's down for the weekend) I'll be looking into the other two methods of deformation and shoot test videos for the actual geo to be displaced upon. Researching different color and depth methods (extracting z-depth out of video). Hopefully, by the end of next week, I'll have a proof of concept combining both techniques (displacement and lightrigs)


Wednesday, 23 April 2008
fractal based deformations
Now the lightrig is done it's time to move on to the deformations. Lot's to play around with. First tests done with touch 101 and houdini. Made a little fractal based video with touch and used that info to drive deformations with a standard pic function in houdini. It does give some nice organic shapes and the original structure get's washed away by the smootheness of the shape.
And the original:
Monday, 21 April 2008
Moodtest
Based on my procedural lightrig (and particlesystem) I made this little test in Houdini and Shake. Lights in the end should go out and there was something wrong with the shadow pass. But the overall feeling is there. Synced to the music. Something to work from.
Sunday, 20 April 2008

Saturday, 19 April 2008
Used Python Script
The Python script
##LOAD ENVIRONMENT
import hou,os,string,sys
##CREATE VARIABLE OUT OF PRIMITVE GROUPS
number_groups1 = hou.node("obj/fractured_object/nogroups").parm("nogroups").evalAsInt()
##CREATE LIGHT FOR EVERY GROUP AND SET PARAMETERS
for i in range(0, number_groups1):
tempvar = hou.node("/obj").createNode("hlight")
tempvar.parm("l_tx").setExpression("chop(\"../chopnet1/Out_Position/group_"+str(i)+":positionx\")")
tempvar.parm("l_ty").setExpression("chop(\"../chopnet1/Out_Position/group_"+str(i)+":positiony\")+0.5")
tempvar.parm("l_tz").setExpression("chop(\"../chopnet1/Out_Position/group_"+str(i)+":positionz\")")
tempvar.parm("light_intensity").setExpression("chop(\"../chopnet1/Out_Intens/group_"+str(i)+":impulse\")")
tempvar.moveToGoodPosition()
##CREATE POPNETWORK
geo = hou.node("/obj").createNode('geo')
popnet = geo.createNode('popnet')
emitter = popnet.createNode('location')
gravity = popnet.createNode('force')
collision = popnet.createNode('collision')
attribute = geo.createNode('attribcreate')
point = geo.createNode('point')
copy = geo.createNode('copy')
trail = geo.createNode('trail')
transform = geo.createNode('xform')
sphere = geo.createNode('sphere')
gravity.setFirstInput(emitter)
collision.setFirstInput(gravity)
attribute.setFirstInput(popnet)
point.setFirstInput(attribute)
transform.setFirstInput(sphere)
copy.setFirstInput(transform)
copy.setNextInput(point)
trail.setFirstInput(copy)
##SET POPNETWORK
trail.setDisplayFlag(True)
trail.setRenderFlag(True)
collision.setDisplayFlag(True)
collision.setRenderFlag(True)
collision.setTemplateFlag(False)
##DESTROY FILE NODE
hou.node('/obj/geo1/file1').destroy()
#SET PARAMETERS
gravity.parm('forcey').set('-5')
collision.parm('soppath').set('/obj/Grid/grid1')
attribute.parm('name').set('pscale')
attribute.parm('varname').set('pscale')
attribute.parm('value1').setExpression('fit(abs($VZ),0,1,0,0.5)')
transform.parm('scale').set('0.07')
emitter.parm('life').set('5')
emitter.parm('lifevar').set('2')
##DUPLICATE POPNETWORK FOR EVERY GROUP
for i in range(1, number_groups1):
hou.hscript('opcp /obj/geo1 /obj/geo+i')
LarsAwsomeVars = "geo"+str(i+1)
hou.node("obj/"+LarsAwsomeVars+"/popnet1/location1").parm("locx").setExpression("chop(\"../../../chopnet1/Out_Position/group_"+str(i+1)+":positionx\")")
hou.node("obj/"+LarsAwsomeVars+"/popnet1/location1").parm("locy").setExpression("chop(\"../../../chopnet1/Out_Position/group_"+str(i+1)+":positiony\")+0.5")
hou.node("obj/"+LarsAwsomeVars+"/popnet1/location1").parm("locz").setExpression("chop(\"../../../chopnet1/Out_Position/group_"+str(i+1)+":positionz\")")
hou.node("obj/"+LarsAwsomeVars+"/popnet1/location1").parm("constantactivate").setExpression("chop(\"../../../chopnet1/Out_Part/group_"+str(i+1)+":impulse\")")
##DELETE ORIGINAL POPNETWORK
hou.node('/obj/geo1').destroy()
Procedural Lightrig and Particle System done
Finished the Python script that generates particle systems and lights. It assigns them autmatically to the right DOP object and uses the processed channel data to make them do whatever they need to do (emit particles or light up). By generating a node for every shard you get a lot f individual control as well. Something that would not be possible using a copy sop or any other instancing method.
Wednesday, 16 April 2008
Procedural Lightrig based on Impact
Few more tests, playblastst. Now with the ability to create any number of shards and automatically update the number of lights and link them to the desired piece of geo based on RBD's. Fully automatic, done with python, expressions and my big love Houdini!
Light Impact Tests
Two tests using DOP data to control light transformations, light intensity, particle emission, particle size and particle position. Custom attributes added to use velocity information icm with point sop.
Goal was to create light based on impact. So the light had to know where the RBD is and light up on impact. Particles added for some debree and sparks. Same principle.
Goal was to create light based on impact. So the light had to know where the RBD is and light up on impact. Particles added for some debree and sparks. Same principle.


Subscribe to:
Posts (Atom)